
I have made these Baked Garlic Potato Wedges many times, each time with some variation or the other, and it has always come out super well. It's a pity these baked potato wedges took this long to show up here but the main reason is, this is a recipe I always use to show off how awesome I am (works each time like a charm) so it's almost always made when I have someone visiting.

Finally, I decided enough is enough and managed two quick photos on the side table before I served them. I should say that my skills of cutting potato into wedges have greatly improved since the first time, purely out of practice. I had plans to make a video of how to get perfect potato wedges but that will have to wait for another time.
Meanwhile, make bake these! It's garlicky potato wedges that are tastier than the fried ones, uses minimum oil, is crunchy on the outside and super soft on the inside, its pure deliciousness!
There's a reason why they are the most popular recipe on The Purple Foodie.
For more potato recipes, check out:
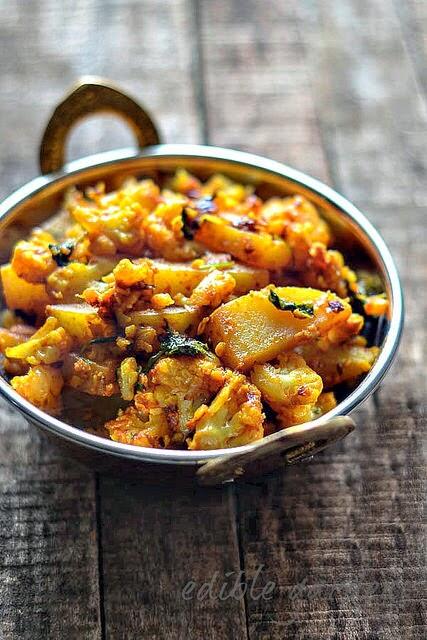
Aloo gobi
Baby potato biryani
Bombay potatoes
Baked Garlic Potato Wedges
Serves 2
Ingredients:
2 large russet potatoes (or whatever type of potato you have locally)
8 small garlic cloves, freshly crushed
6 tablespoon olive oil
3 tablespoon cornstarch/cornflour
1 ½ teaspoon sea salt (or regular salt)
1 ½ teaspoon freshly ground black pepper
½ teaspoon paprika or Kashmiri red chilli powder
½ teaspoon garlic powder (optional)
How to Make Baked Potato Wedges
0. Warm the olive oil (either in a microwave or in a small pan over the stove) and add the crushed garlic pieces. Let the olive warm up and the yummy juices of the garlic seep into it. Dont heat the oil too much, just nicely warm it. Set this oil aside to infuse well until you need it. Pre-heat oven to 200C / 390F.
1. Bring a saucepan with 4 cups water to a boil. Scrub the potatoes clean (don't peel) and insert into the boiling water. Simmer and let the potatoes par-boil. It usually takes me 10-12 mins. When a knife is inserted it should go in without effort but make sure the potatoes don't become cooked soft or mushy. Remove from water and let it cool on a plate.
2. Cut the cooled potatoes into wedges. I cut each lengthwise into half. Then each piece gets cut into further halves and each of that half into 3 more wedges. Sorry for making you do math when all you want is some baked garlic wedges but that makes 12 wedges in all, per potato.
3. Transfer the potato wedges into a large bowl. Pour in the infused olive oil (remove the crushed garlic pieces), and add all other ingredients into the bowl. Mix gently until well combines. It's important to make sure that the corn flour coats all the pieces well. I usually do this step by hand, rubbing all the ingredients gently into the potato pieces. Crack some pepper on top again if you'd like once you are done mixing.
4. Lay the pieces on a baking tray (you can either use a baking sheet like Silpat, parchment paper, or aluminum foil to line the baking tray) without overlapping. If your baking tray is small, bake in two batches but make sure that you line the potato wedges in a single layer.
5. Bake in the pre-heated oven for 30-40 mins until the wedges are golden brown and crisp on the outside. It may be a good idea to turn the baking tray around once during baking so that all the pieces get uniform heat, more or less. My oven has uneven heat in some corners and I am positive yours does too.
6. Once baked, serve hot with ketchup, mayonnaise, chilly sauce or Sriracha.![]()
![]() .
.
Note:
- I have tried many variations in this recipe like adding minced garlic directly into the potato wedges mixture, using regular oil instead of olive oil, cutting potatoes into wedges first and then par-boiling, etc. The quantities and ingredients above gave me the best result so I stick to that now. I have a small bottle of powdered garlic that I have bought specifically to make these baked garlic potato wedges. It really adds to the flavour.

anylinde
Is it okay to use groundnut oil? Will it affect the taste in any way?
Nagalakshmi V
any neutral oil should work fine, try with peanut oil, should be ok 🙂
anylinde
Okay thanks 🙂
Vandana Kapoor
Why does mine don't look as orange as yours? they look green (prolly cz of the olive oil),Only my deep fried fingers look like this, why? :O
Nagalakshmi V
hmm.. green is definitely not the colour it should look like 🙂 i use kashmiri chilli powder which is why it's quite red. apart from that, the lighting could also make it deeper than it is.
Anonymous
Cooked these for dinner tonight will have to cook em' again for my 13 yr old son who is nnot home tonight, speeded up the process by popping em' in the freezer for 15mins.to cool and tossed with garlicky oil and then I used a plastic storage bag to toss and coat with other ingredients and they are DEEELLLLLLIIIIISSSSSHHHHHHHuuuuuussssssss!!!!!!!!!!!!!
Unknown
Hi, Thanks a lot for sharing this recipe. I tried it last night and it came out so delicious. I didn't had cornflour at home so I used maida (all purpose flour), yet it came out very well. Next time I will try with cornflour 🙂
Anu Nandu
On my todo list for a long time - looks crazy good!
Nags
Nishi, you should preheat for about 12 mins or so.
Nishi
The wedges didnt come out as expected nags:(for how many minutes should the oven be pre heated?
Nishi
Hi nags:):)tried ur pasta recipie which gave me amazing results 🙂 now gonna try the wedges tonight :):) hope it comes out great . . .your doin a great job 🙂 thanx for all the recipies
Gayathri Ramdas Sreekanth
Hey Nags..Tried this just sometime back..It tasted great..Just like the restaurant ones ! Although they could use great help in the looks department.But tasted just yum nevertheless ! Thanks for the great recipe !
Angylisis
Oh yes, these are on the menu for tonight! Thanks!
Love-Mandy
I'm going to make these tonight!! Yummm!! Thank you:)